
If you’ve been a little out of the loop, The Sims 4‘s latest update added platforms to the game! The platforms are intended to be used to make split-level rooms, stairs, and a few other neat things, but of course, Simmers found a way to push the boundaries of this new tool and create functional bunk beds.
I did not come up with the idea of using platforms to make bunk beds. I initially saw Pugowned‘s bunk bed featured in a Sims Community article. I then watched James Turner’s video where he tried to replicate what Pugowned did.
However, I wanted to do something even more elaborate. I posted the picture above in the Sims Community Facebook group and people seemed to really like it and asked me to do a tutorial on how to create this. So here it is!
Step 1: Get Your Dimensions Right
A standard sized single bed in The Sims 4 takes up 3 tiles. We want to have two beds along one wall with a 1-tile staircase in between. Make a room with one side that is exactly 7 tiles. The length of the other side does not matter as long as there’s enough space for Sims to move around in the room.

Step 2: Place Your Platform & Stairs
To better understand platforms, think of them as mini-foundations that don’t affect the entire building. You can either use the new platform tool or simply build a room and raise it so that it becomes a platform. Building a room is my preferred method.
Inside this room, we are going to build another room along the 7-tile wall that is only 1 tile, like the picture below.
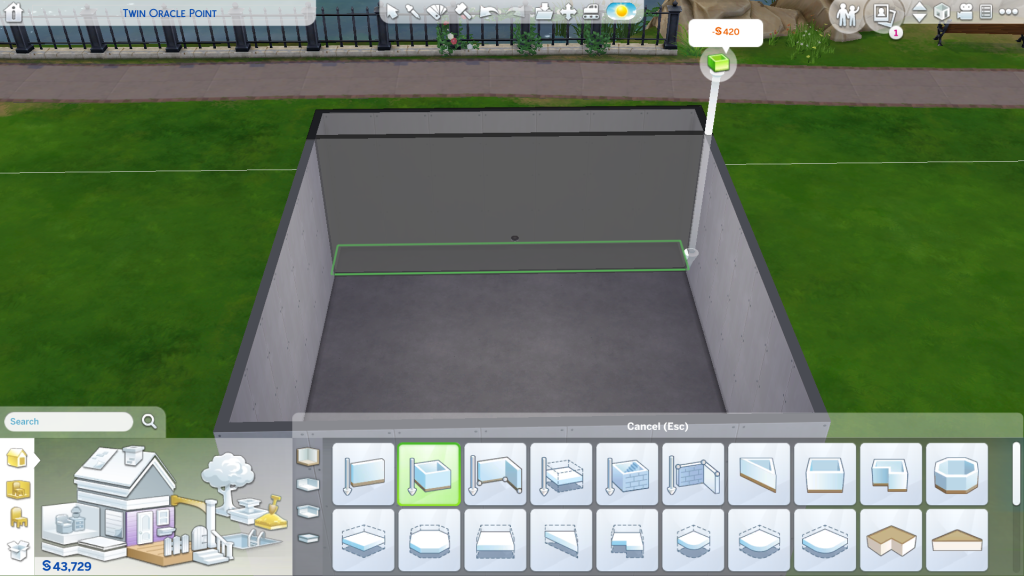
Then click the room and press the UP arrow exactly 5 times.

Now, delete the wall separating the rooms to end up with this:

We now have our base for this entire project, yay! Next, place some stairs in the very centre tile connecting the platform with the level below. You can use whatever stairs you like. I am using the ones that came with the Snowy Escape expansion.

Step 3: Put the Beds in Place
Now comes the fun part… or complicated part, depending on how you look at it. We are going to start putting the beds in place.
IMPORTANT! Enable moveobjects at this point. It is essential for the next step. On PC, do this by hitting CTRL+SHIFT+C to bring up the cheat box, then type in bb.moveobjects on and hit Enter. On console, press all four back triggers at the same time to bring up the cheat box and either X (PS4) or A (Xbox) to confirm after entering the same cheat. This cheat will not disable trophies and achievements on console.
Place the two bottom bunks normally the way you would place any bed. You may be very slightly tweaking their placement later, but for now, just place them normally. You can use any single bed you want, but I find the ones with flat bases look the best.
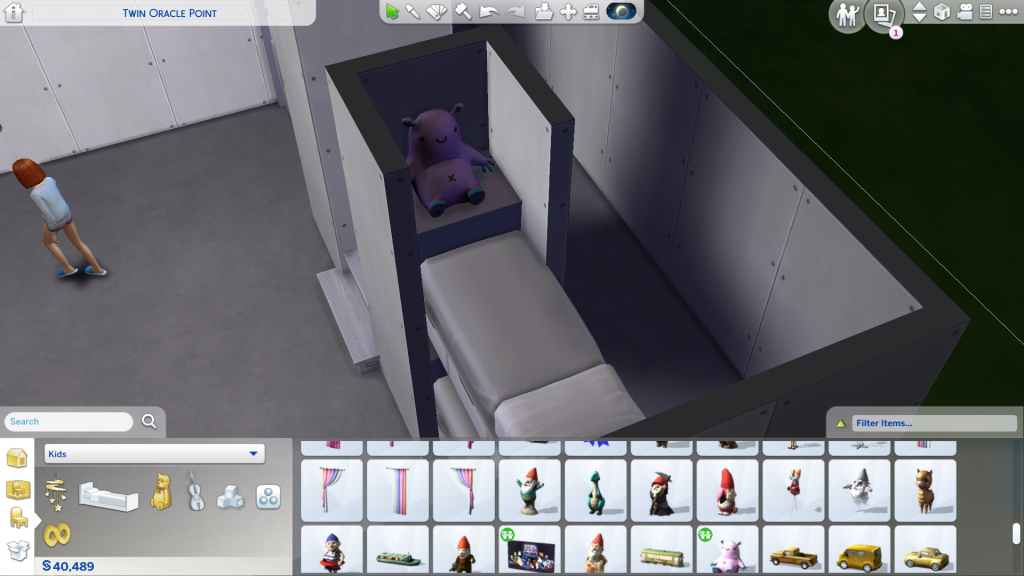
Now, let’s put the top bunks in place. Press the 9 key (or top direction pad for console) to raise the bed until it is either level with or just barely above the height of the platform.
Next, hold down the Alt key (or L2/LT on console) with the bed still selected and very carefully move it so that it just barely overlaps with the lip of the platform.

Before moving on to do anything else, playtest the beds! There’s nothing worse than finishing an amazing room only to discover nothing in it is usable and you have to destroy all your hard work and redo a lot of it. Playtest frequently as you’re building so that way, if something doesn’t work, you don’t have to backtrack too far to fix it.
As you can see below, my two child Sims can use the two top beds without any trouble.
TIP! You might discover your beds aren’t usable the first time you try this. That’s okay! Just keep fiddling and fine-tuning the placement until they can use the bed. I’ve found it’s best to raise the top bunk just baaaaarely higher than the platform rather than having it just slightly below the platform’s height.

Step 4: Build Surrounding Structures
TIP! At this point, you want to avoid moving the beds from here on out, especially the top bunks. You’ve already playtested and established that they work, so the tiniest micro-fraction of an adjustment could cause them to not work anymore. If you do need to make slight adjustments, playtest every single time you move them.
Of course, we don’t want these beds to look like they’re floating in mid-air. For this build of mine, I wanted all the beds to look like one cohesive unit built right into the rest of the house, so I used walls to enclose the bottom portion of the beds.
Just draw walls around the beds the way I’ve shown in the picture below:

You’ll notice empty gaps between the foot of the beds and the walls after you do this. I like to fill in this gap and turn it into a cute little shelving nook. I do this by putting an accent table in this spot using just the Alt key for the bottom bunks. For the top bunks, I use the 9 key to raise the table up and the Alt key to fine-tune the placement.
I used an end table from the base game for this, but you can play around with different tables and/or shelving to see what you like the best.

When finished, you will have a cute little shelf at the footboard to place books, toys, and other clutter objects on for an adorable decorative touch.
TIP! Don’t worry if your surface overlaps the bottom of the bed a bit; in general, as long as the tile where the pillow is remains completely unobstructed, Sims can usually get in and out of bed without any problems.
We are almost done now! We just need to fill in the small gap behind the headboards and make them look like they’re part of the wall. For this, I used a room divider from Get Famous, but you can use almost anything you like to create a built-in headboard here.
As usual, I just used the Alt key to place the divider in just the right spot behind the beds’ headboards to give it a more seamless and supported look.

In some cases, you might find yourself having to fine-tune the placement of the beds just slightly with the Alt key to get them centred behind your choice of headboard properly. Try to avoid it if you can, but if you do make micro-adjustments to the bed positions, make sure you playtest, playtest, playtest!
TIP! There are lots of items in the game that can make good bunk bed posts/headboards! You can use the cheats bb.showhiddenobjects and bb.showliveeditobjects, then search DEBUG in the search bar to bring up lots of decorative posts and columns to use. Alternatively, if you have a lot of packs, there are loads of stylish dividers and panels in [Decor > Wall Decor] and [Decor > Misc.] in the catalogue.
Step Five: Decorate!
That’s it! All the hard stuff’s over and done with now! Just playtest each bed one more time to confirm everything is still working, then start making the room pretty! Paint the walls, lay down flooring, furnish the rest of the room, and clutter up the place with lots of decorative objects and paintings!
From this:

To this!
This finished room only accommodates children on the top bunks; the platform is too high and the ceiling too low for teens and adults to access it. I did this deliberately because I love the idea of having these special kid-only zones, but if you want older Sims to be able to use the top bunks, there’s a simple solution: just make the walls taller!
Did you like this tutorial? Do you have questions? Leave them in the comments below!
I will not answer any questions regarding troubleshooting the game. I don’t do tech support. I will only answer questions about the tutorial.

awesome tutorial
LikeLiked by 1 person